How to translate exported content with Memsource
To translate the content you’ve just exported from the EPI Server you can use the Memsource CLOUD service. This service allows you to run through the translation process in an efficient and intuitive way.
To begin with, you log in to the Memsource CLOUD service and create a project, or use existing one.

When you’ve created (or selected) a project you open it and system will navigate you to the main project form. This form represents the project information you’ve provided, like:
- “Name” - project name.
- “Created by“ - represents a user who created a project.
- “Created“ - project creation date.
- “Status“ - project status.
- “Source Language“ - the source language of document(s) you plan to translate in scope of a project.
- “Target Languages“ - a list of languages you plan to translate source document(s) to.
- “Machine Translation” - machine translation option (if you plan to use one).
- “Owner” - user who owns a project.

Project form also represents a list of translation jobs created within a project. From the beginning this list is empty and we have to create one to proceed. To do it, we press “New” button in the list of jobs. After you’ve done it, you will be navigated to the following Job form:

These settings are not 100% fit iLangL Cloud configuration but in most cases sufficient for the formation of a workable job.
Couple important things have to be done here.
- You have to upload a source file you plan to translate (the one, you’ve exported from your website).
- Select one or several target languages
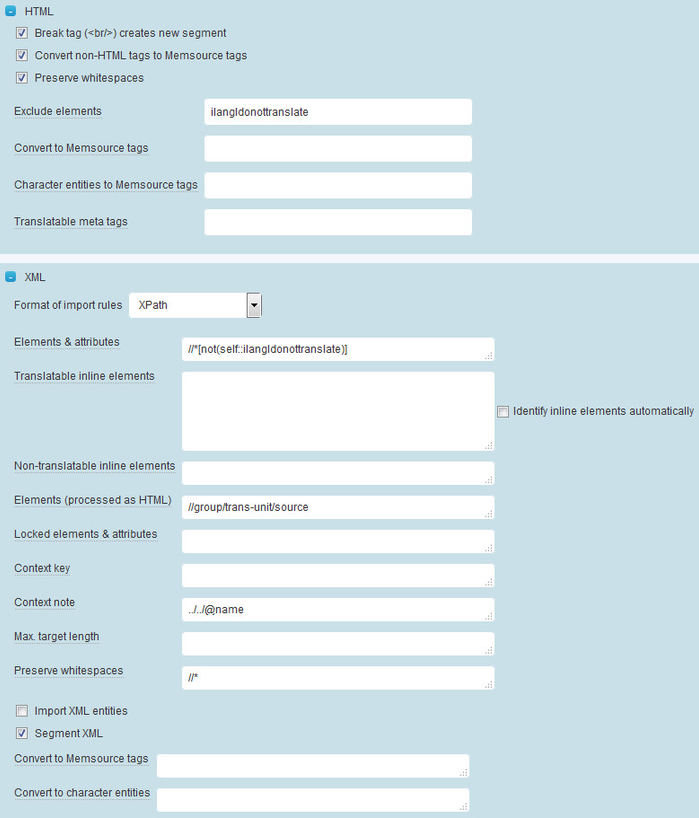
And make sure that values for following settings are set as described below:
4. Click the “Create” button. Done! - job is now created.

From this point, the actual translation begins. Now to start the translation you have to click the “File” link in the “Jobs” table. This will navigate you to the “Memsource Web Editor” - the page where you will actually translate source content segment by segment.
Note:if you select for ex. 4 target languages when adding a job - 4 jobs will be created (1 for each unique language pair).

Here you basically translate the content from the “Source: ” section and put it into the “Target: ” section. When a target segment is translated you put a green check-mark, to indicate the translation progress.
Useful hot-keys:
- Ctrl + Insert - copies source segment content into the target one (including tags).
- Ctrl + Enter - confirms currently focused segment (puts a check-mark).
As your translation moves on, the job progress will be reflected in the “Jobs” table on the Project form (“Confirmed %” column).

When, finally, document will be translated, you can download the completed file (via function shown on the picture above) and proceed with importing this content back to your web site.